Instructions for Warping a Loom
Making the Warp
![](https://christinekeller.co.nz/wp-content/uploads/1677/10/LoomRoom-e1682772046672-300x157.png)
Step One: measure and tie on guiding thread to warping frame.
![20231006_134501 sm](https://christinekeller.co.nz/wp-content/uploads/20231006_134501-sm.jpg)
Make a loop.
![](https://christinekeller.co.nz/wp-content/uploads/20231006_134528.jpg)
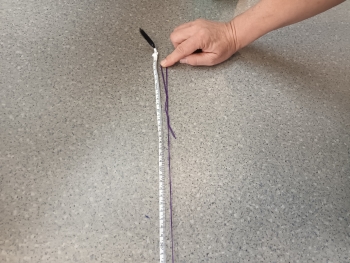
Measure from the top of the loop to the required length. Do not cut.
![20231006_134650 sm](https://christinekeller.co.nz/wp-content/uploads/20231006_134650-sm.jpg)
Make a slip knot at the end.
![](https://christinekeller.co.nz/wp-content/uploads/20231006_134630.jpg)
Adjust the height of the warping frame on the wall to suit your height.
![20231006_134737 sm](https://christinekeller.co.nz/wp-content/uploads/20231006_134737-sm.jpg)
Put the first loop onto the top of the frame on peg 1 and the other loop on to bottom peg c.
![kerry putting in a warp and having fun](https://christinekeller.co.nz/wp-content/uploads/20231006_134807-sm.jpg)
2 and 3 are needed for the top cross and a, b, c for the bottom cross.
![hello](https://christinekeller.co.nz/wp-content/uploads/20231006_134850-sm.jpg)
Put round other pegs fitting in cross between 2 and 3 on the top and between b and c on the bottom. Adjust the length at the slip knot if needed.
Step Two: winding the warp on:
A: with one thread
![20231006_134650 sm](https://christinekeller.co.nz/wp-content/uploads/20231006_134650-sm.jpg)
Put the bobbin on the stand and thread through the eyelet.
![](https://christinekeller.co.nz/wp-content/uploads/20231006_134630.jpg)
Make sure that the thread can run freely from the bobbin through the eyelet.
![20231006_134737 sm](https://christinekeller.co.nz/wp-content/uploads/20231006_134737-sm.jpg)
Make a slip knot on top and put on no 1.